How to Make a Photo Frame in Photoshop

and, there are a few steps to follow and a few things you should keep in mind :
- Keep in mind what color(s) in a frame works best with the colors of the photograph/image. I feel that the frame helps people digest the photograph sometimes. If I have a very dark image, I might choose to have a black frame to help the mind transition from the background of the web page or wall to the image. But if the image doesn't have pure blacks in it, a totally black frame will make the image look washed out. Alternatively, an all white frame will make a washed out image look a little better sometimes. So experiment.
- Have an idea of what you want to accomplish. And remember that ideas are guidelines. If you can't make your vision work exactly the way you envisioned it, try something else.
- Making a frame will increase the file size of the image. So if you have a slow computer, resize the image to approximately the final output size, then make the frame. This is especially true with Photoshop CS.
OK, now on to the frames. My apologies to the dial-up members. This tutorial is graphics-intensive. I have tried to lower the image quality as far as possible in order to keep the file sizes low.
Next we will resize the image closer to the final output size. For web pages, I like to make the image no larger than 550 or 600 pixels tall. And no more than 600 pixels wide. People on dial up or who are running 800 x 600 screen resolutions will have problems with files larger than that.

Once we have done that, we will change the canvas size. Enlarging the canvas size will create a larger space to work with. Contracting the canvas size will crop the image. Don't worry, if you select the wrong one, you will be warned.
I like to use the "relative" option, so I can enlarge a certain number of pixels without having to add the new number of pixels to the image size. Math. Who needs it?

In PS CS, a new nice feature is being able to change the canvas extension color. You have several options. For now, I am going to choose white.

This gives us a little white border.

If we do this a few more times, alternating between black and white canvas extension colors, we will get something like this.
These new border colors are applied to the bottom layer of your image.

OK, this way works. But there is another way we can do this which will give us a few more options. And remember, this is Photoshop. So there are a few ways to do everything.
Let's go back to our original image and start making a new frame. This time, let's make the full size frame that we will want.

We end up with something like this. This could work on its own as a frame. But let's add that inner border.

Select the rectangular marquee tool and make a selection inside the boundaries of the frame. You can't hit Control + A (select all) because the options we will want later won't be available. So carefully try and make a box selection that parallels the edges of the frame.

We end up with the "marching ants" or marquee selection like this.

Hit Shift+Control+N (or Layer > New Layer) and name the new layer, "Inner Border". Place this layer all the way at the top of your layer palette.

Now we will fill this selection box. Hit Shift+F5 (or Edit > Fill) and fill the selection box with black.

Our image is now covered up. But don't worry. We will delete that part. First we need to contract the selection a certain number of pixels before we remove the excess. So to do this, we can right click in the selection box, or we can just go to Select > Modify > Contract. I will contract the selection box 4 pixels for this demonstration, in order to get a 4 pixel inner border.

Like so...

Hit Control + X or Edit > Cut to remove the selected part of the black. We end up with something like this

Now we have our inner border. Because it is a separate layer, we can move it around, change its color easily, resize it, do blending options (for drop shadows or whatever), apply filters to it, etc.
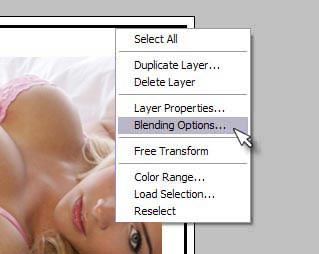
To make a blending option, right click anywhere on the image with the marquee tool, or right click on the layer in the layers palette.
You have a lot of options. After adding a drop shadow, and adding an outer-most border to the frame, I ended up with the following final image. Don't forget to add your circle c.
Hopefully you found this tutorial helpful and complete.

Good luck !
